

Authentication is a fundamental part of any secure application. While AWS Cognito provides built-in support for common sign-in methods like username/password and social logins, sometimes you need more flexibility. What if you want users to log in using a one-time password (OTP)? Or create a multi-step login process tailored to your product’s specific requirements?
That’s where Cognito’s custom authentication flow shines.
Custom auth gives you complete control over how users log in — whether you’re implementing OTP-based access, magic links, biometric flows, or organization-specific verification steps. In this post, we’ll break down how the custom authentication flow works in AWS Cognito and walk through a real-world use case: building a passwordless login with SMS-based OTP.
If you’re looking to build a frictionless sign-in experience or inject business logic into your auth process, this guide will help you get started using AWS Cognito and Lambda functions.
In a custom authentication flow, you take complete control over the entire process. Rather than relying on Cognito’s standard username and password validation, you implement your own method to confirm a user’s identity.
This method is built around a challenge-response model: you issue a challenge—whether that’s an OTP, CAPTCHA, or even a magic link—and require a valid reply before granting access. The real advantage of this approach is its total flexibility; you choose the challenge, decide how it’s delivered, and determine the criteria for a valid response.
AWS Cognito makes this possible by using three Lambda triggers that orchestrate the flow:
By orchestrating logic across these three Lambda functions, you can build virtually any authentication experience you want — from simple passwordless logins to complex, multi-layered enterprise auth flows.
Below is how the client, Cognito, and Lambda triggers work together to orchestrate a full authentication flow — step by step:
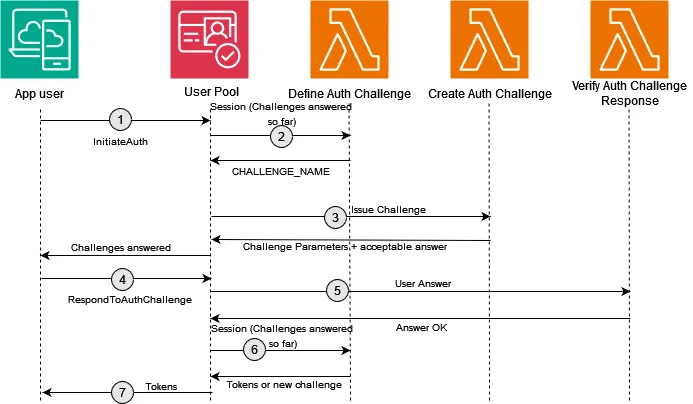
1. User Initiates Login
The client application (e.g., your frontend or mobile app) starts the login process by calling the InitiateAuth API using the CUSTOM_AUTH flow. This request typically includes the username , which could be a phone number, email, or any unique identifier.
Example: A user enters their phone number and clicks “Send OTP.”
2. Cognito Triggers DefineAuthChallenge
Cognito invokes the DefineAuthChallenge Lambda to decide the next action. For the first attempt, this function tells Cognito to create a new challenge (e.g., send an OTP).
It inspects the user’s session state and decides:
You will need to implement this logic, and we will see how simple that is later.
3. CreateAuthChallengeSends the OTP
Cognito then calls the CreateAuthChallenge Lambda. This function is responsible for generating the actual challenge. Since the lambda implementation is yours, you have the full freedom to create the necessary challenge ( in our case, a random 6-digit OTP and sending it to the user via SMS using Amazon SNS).
The answer (e.g., generated OTP value) is securely passed to Cognito in the privateChallengeParameters, while the client may receive a public message related to a challenge, such as “OTP sent to your phone.”
4. User Responds with the Answer
Then the client should resolve the challenge and send it back using RespondToAuthChallenge along with the answer (e.g., the entered OTP). It should include the session token received in the first step, allowing Cognito to track this challenge session.
5. VerifyAuthChallengeResponse Validates the Input
Cognito now calls the VerifyAuthChallengeResponse Lambda. This function compares the answer the user entered (e.g., OTP) with the expected value stored in the private parameters. If it matches, answerCorrect is set to true considering the user as authenticated since he/she was able to solve the given challenge.
6. Cognito Calls DefineAuthChallenge Again
Finally, Cognito makes one last call to DefineAuthChallenge. This time, based on the result of the previous challenge:
If the answer was correct, it sets issueTokens = true, completing the login flow. If the answer was incorrect or attempts exceeded, it can fail the authentication.
This is the end of the authentication flow and the client will receive the corresponding JWT tokens for the authenticated user if the login challenge was answered correctly. Now let’s see a application of this by implementing a passwordless login with OTP via SMS.

To make this concept more tangible, let’s walk through a real-world example: implementing a passwordless login experience using AWS Cognito’s custom authentication flow and one-time passwords (OTP) sent over SMS.
This is a popular use case when:
With this setup, users sign in using just their phone number. If the number exists in your user pool, Cognito invokes a Lambda function that generates a 6-digit OTP and sends it via SMS using Amazon SNS. The user enters the received code, and if it matches, they’re authenticated and allowed access.
We will be using Terraform to create the infrastructure for this setup. But you can use any tool to create the infrastructure or use the AWS console to create all the resources manually.
Let’s look into the main terraform file (main.tf) first since it includes all the AWS resources we need. It is composed with below.
provider "aws" {
  region = "us-east-1"
}

resource "aws_iam_role" "lambda_exec" {
  name = "cognito_custom_auth_lambda_exec"
  assume_role_policy = jsonencode({
    Version = "2012-10-17",
    Statement = [
      {
        Action = "sts:AssumeRole",
        Effect = "Allow",
        Principal = {
          Service = [
            "lambda.amazonaws.com",
            "cognito-idp.amazonaws.com"
          ]
        }
      }
    ]
  })
}

resource "aws_iam_role_policy_attachment" "lambda_basic_exec" {
  role       = aws_iam_role.lambda_exec.name
  policy_arn = "arn:aws:iam::aws:policy/service-role/AWSLambdaBasicExecutionRole"
}

resource "aws_iam_policy" "sns_publish_policy" {
  name        = "sns-publish"
  description = "Allow publishing SMS messages"
  policy = jsonencode({
    Version = "2012-10-17",
    Statement = [{
      Effect = "Allow",
      Action = "sns:Publish",
      Resource = "*"
    }]
  })
}

resource "aws_iam_role_policy_attachment" "sns_publish" {
  role       = aws_iam_role.lambda_exec.name
  policy_arn = aws_iam_policy.sns_publish_policy.arn
}

data "archive_file" "define_auth_zip" {
  type        = "zip"
  source_file = "${path.module}/lambda/define-auth-challenge.js"
  output_path = "${path.module}/lambda/define-auth-challenge.zip"
}

data "archive_file" "create_auth_zip" {
  type        = "zip"
  source_dir = "${path.module}/lambda/create-auth-challenge"
  output_path = "${path.module}/lambda/create-auth-challenge.zip"
}

data "archive_file" "verify_auth_zip" {
  type        = "zip"
  source_file = "${path.module}/lambda/verify-auth-challenge.js"
  output_path = "${path.module}/lambda/verify-auth-challenge.zip"
}

resource "aws_lambda_function" "define_auth" {
  function_name = "DefineAuthChallenge"
  role          = aws_iam_role.lambda_exec.arn
  handler       = "define-auth-challenge.handler"
  runtime       = "nodejs22.x"
  filename      = data.archive_file.define_auth_zip.output_path
  source_code_hash = filebase64sha256(data.archive_file.define_auth_zip.output_path)
}

resource "aws_lambda_function" "create_auth" {
  function_name = "CreateAuthChallenge"
  role          = aws_iam_role.lambda_exec.arn
  handler       = "create-auth-challenge.handler"
  runtime       = "nodejs22.x"
  filename      = data.archive_file.create_auth_zip.output_path
  source_code_hash = filebase64sha256(data.archive_file.create_auth_zip.output_path)
}

resource "aws_lambda_function" "verify_auth" {
  function_name = "VerifyAuthChallenge"
  role          = aws_iam_role.lambda_exec.arn
  handler       = "verify-auth-challenge.handler"
  runtime       = "nodejs22.x"
  filename      = data.archive_file.verify_auth_zip.output_path
  source_code_hash = filebase64sha256(data.archive_file.verify_auth_zip.output_path)
}

resource "aws_cognito_user_pool" "custom_auth_pool" {
  name = "custom-auth-user-pool"

  lambda_config {
    define_auth_challenge        = aws_lambda_function.define_auth.arn
    create_auth_challenge        = aws_lambda_function.create_auth.arn
    verify_auth_challenge_response = aws_lambda_function.verify_auth.arn
  }

  sms_configuration {
    external_id    = "cognito-sms-external-id"
    sns_caller_arn = aws_iam_role.lambda_exec.arn
  }

  sms_authentication_message = "Your authentication code is {####}"

  auto_verified_attributes = ["phone_number"]

  schema {
    name     = "phone_number"
    attribute_data_type      = "String"
    required = true
    mutable  = true
  }

  username_attributes = ["phone_number"]
}

resource "aws_cognito_user_pool_client" "app_client" {
  name         = "custom-auth-app-client"
  user_pool_id = aws_cognito_user_pool.custom_auth_pool.id
  generate_secret = false

  explicit_auth_flows = [
    "ALLOW_CUSTOM_AUTH",
    "ALLOW_REFRESH_TOKEN_AUTH"
  ]
}

# Permissions for Cognito to invoke Lambda
resource "aws_lambda_permission" "define_auth" {
  statement_id  = "AllowCognitoInvokeDefineAuth"
  action        = "lambda:InvokeFunction"
  function_name = aws_lambda_function.define_auth.function_name
  principal     = "cognito-idp.amazonaws.com"
  source_arn    = aws_cognito_user_pool.custom_auth_pool.arn
}

resource "aws_lambda_permission" "create_auth" {
  statement_id  = "AllowCognitoInvokeCreateAuth"
  action        = "lambda:InvokeFunction"
  function_name = aws_lambda_function.create_auth.function_name
  principal     = "cognito-idp.amazonaws.com"
  source_arn    = aws_cognito_user_pool.custom_auth_pool.arn
}

resource "aws_lambda_permission" "verify_auth" {
  statement_id  = "AllowCognitoInvokeVerifyAuth"
  action        = "lambda:InvokeFunction"
  function_name = aws_lambda_function.verify_auth.function_name
  principal     = "cognito-idp.amazonaws.com"
  source_arn    = aws_cognito_user_pool.custom_auth_pool.arn
}
Then let’s see the most important part of the implementation which is the lambda handlers implementation.
This Lambda function’s primary role is to decide what should happen next in the authentication process, based on the user’s session history. Cognito invokes it multiple times throughout the custom authentication flow, using its responses to guide the next step in the sequence.
exports.handler = async (event) => {
  if (event.request.session.length === 0) {
    event.response.challengeName = 'CUSTOM_CHALLENGE';
    event.response.issueTokens = false;
    event.response.failAuthentication = false;
  } else if (
    event.request.session.length === 1 &&
    event.request.session[0].challengeResult === true
  ) {
    event.response.issueTokens = true;
    event.response.failAuthentication = false;
  } else {
    event.response.issueTokens = false;
    event.response.failAuthentication = true;
  }
  return event;
};
The logic of this handler is very simple.
Inside this Lambda handler, you define the challenge you want to present to the client. In our case, that means generating a one-time password (OTP) and sending it to the user via SMS using Amazon SNS.
const { SNSClient, PublishCommand } = require('@aws-sdk/client-sns');
const sns = new SNSClient();

exports.handler = async (event) => {
  const phoneNumber = event.request.userAttributes.phone_number;

  console.log("Phone number:", phoneNumber);

  try {

    if (event.request.session.length === 0) {
      const otp = Math.floor(100000 + Math.random() * 900000).toString();

      await sns.send(new PublishCommand({
        Message: `Your verification code is: ${otp}`,
        PhoneNumber: phoneNumber,
      }));

      console.log('OTP sent successfully');

      event.response.publicChallengeParameters = {
        message: 'OTP sent via SMS',
      };

      event.response.privateChallengeParameters = {
        answer: otp,
      };

      event.response.challengeMetadata = 'SMS_OTP_CHALLENGE';
    }
    return event;
  } catch(e) {
    console.log('error:', e);
  }
};
Here an important thing to notice is that it sets,
The private parameter is very important because we will be using it later to verify the challenge.
This Lambda function’s job is to verify if the user’s response to the challenge is correct. In our example, it compares the OTP entered by the user with the one previously generated and stored in a private parameter during the authentication flow.
exports.handler = async (event) => {
  const expectedAnswer = event.request.privateChallengeParameters.answer;
  const userAnswer = event.request.challengeAnswer;

  event.response.answerCorrect = userAnswer === expectedAnswer;

  return event;
};
The full implementation of this can be found in this repository.
That’s all we need to setup. Now it’s the time for testing.
To get started, first you will need to create a test user in the cognito pool and then we need to initiate the custom authentication flow. In a production environment, this is typically done using the AWS SDK to kick off the login process. For testing and demonstration purposes, however, we’ll use the AWS CLI instead.
You can initiate the login flow by executing the below CLI command.
aws cognito-idp initiate-auth \
  --auth-flow CUSTOM_AUTH \
  --client-id "<cognito-app-client-id>"\
  --auth-parameters USERNAME="<username of the user>"
In response to this you would receive a session id and you should have received a text message as well from SNS including the OTP.
Once you receive it, now we should respond to it by providing the OTP to solve the challenge. We can do it by executing below command.
aws cognito-idp respond-to-auth-challenge \
  --client-id "<cognito-app-client-id>" \
  --challenge-name CUSTOM_CHALLENGE \
  --session "<session-id-from-previous-response>"\
  --challenge-responses USERNAME="<username>",ANSWER="<received otp>"
If the provide correct values, then it should return the JWT keys for the successfully authenticated user.
While custom authentication flows offer flexibility and power, they also shift more responsibility to you — especially in terms of security. Here are some key considerations to keep in mind when implementing an OTP-based login flow using AWS Cognito:
AWS Cognito’s Custom Authentication Flow offers a powerful way to create authentication experiences precisely tailored to your business and user requirements. Whether it’s building a passwordless login with OTP, adding external identity verifications, or designing complex multi-step authentication sequences, custom auth puts the control in your hands—delivering security and scalability.
In this post, we’ve seen how Cognito leverages Lambda functions to manage a flexible challenge-response flow, and walked through a practical example of SMS-based OTP login. We also covered the full authentication lifecycle, shared implementation tips, and highlighted key security considerations to help you build a reliable, customizable authentication system.